

Changing your car’s engine oil might seem like a daunting task, but it’s a skill that can save you time and money. Imagine the satisfaction of knowing you’re in control of your car’s health, ensuring it runs smoothly and efficiently.
Plus, you won’t have to rely on mechanics for this straightforward task anymore. In this step-by-step guide, you’ll discover exactly how to change your engine oil, making the process easy and stress-free. Whether you’re a seasoned DIY enthusiast or a complete beginner, this guide is tailored just for you.
Ready to take the wheel on your car maintenance journey and boost your car’s performance? Let’s dive in and get started!
Credit: www.basilcars.com
Gather Necessary Tools
Start your engine oil change by gathering essential tools. Grab a wrench, oil filter, drain pan, funnel, and new oil. Having everything ready makes the process smooth and efficient.
Changing your engine oil is a satisfying task that can save you money and time at the mechanic. But before you roll up your sleeves and get started, you’ll need to gather the necessary tools. Having the right items on hand is crucial for a smooth, hassle-free oil change. Trust me, there’s nothing more frustrating than being halfway through the job and realizing you’re missing something important.
List Of Required Items
Before you start, make sure you have all the items listed below. Oil filter wrench, which helps you remove the old oil filter. Socket wrench, essential for loosening the drain plug. A drain pan will catch the old oil, preventing spills that could lead to messy cleanups. New oil filter and the correct type of oil are must-haves to keep your engine running smoothly. Don’t forget a funnel to avoid spills when adding new oil. Finally, have some shop rags or paper towels handy for any unexpected messes.
Safety Precautions
Your safety should always come first. Make sure the engine is cool before you begin. A hot engine can lead to burns or other injuries. Use safety gloves to protect your hands from hot surfaces and chemicals. Ensure the vehicle is on a flat, stable surface and use wheel chocks to prevent any accidental movements. Always use jack stands if you need to lift the vehicle, as relying on a jack alone is dangerous. Have you ever started a project and realized you missed something critical? Being prepared not only makes the process smoother but also safer. Double-check your list and ensure everything is within reach before you start. This preparation step can make all the difference in your DIY oil change experience.
Prepare Your Vehicle
Discover the easy steps to change your engine oil with our guide. Follow clear instructions for a smooth process. Keep your vehicle running efficiently and extend its life with regular oil changes.
Changing your engine oil is a task that empowers you with the knowledge to keep your vehicle running smoothly. But before you get your hands dirty, it’s crucial to prepare your vehicle properly. A well-prepared car ensures the process goes smoothly and safely. This step is more than just a precaution; it’s the foundation of a successful oil change.
Park On Level Ground
Parking your vehicle on level ground is essential. A flat surface prevents the oil from pooling unevenly. This ensures accurate oil drainage and avoids potential safety hazards. Have you ever attempted to change your oil on a slope? It’s a struggle. You might find yourself chasing a runaway oil pan or dealing with inaccurate measurements. Avoid these headaches by choosing a level spot. Consider the spots in your driveway or garage that offer a flat surface. If those options aren’t available, a quiet street or parking lot can be a suitable alternative.
Warm Up The Engine
Warming up the engine is crucial for an efficient oil change. Warm oil flows more easily, making drainage quicker and more complete. A short drive around the block can do wonders. It gets the engine to an optimal temperature without overheating. You’ll notice the difference in how swiftly the old oil drains compared to when the engine is cold. Does warming up the engine seem unnecessary to you? Think again. It helps loosen the oil’s viscosity, ensuring every drop is removed. This simple step can make a significant difference in maintaining your engine’s health. Taking these preparatory steps seriously sets the stage for a smooth and efficient oil change. Are you ready to tackle the next steps with confidence?
Drain The Old Oil
Begin by placing a container under the engine. Carefully remove the drain plug and allow the old oil to flow out completely. Make sure to dispose of the used oil properly to protect the environment.
Changing your car’s engine oil can seem daunting, but focusing on one step at a time makes it manageable. Draining the old oil is a crucial part of the process. It’s where you say goodbye to the tired, used oil and make way for fresh, efficient lubrication. Let’s walk through this step-by-step journey to ensure your engine runs smoothly.
Locate The Drain Plug
Begin by finding the drain plug under your vehicle. Typically, it’s a bolt located at the bottom of your oil pan. If you’re unsure, consult your car’s manual—it’s a lifesaver. Make sure your vehicle is on a level surface. This helps the oil drain completely and prevents spills. A quick tip: use a flashlight to get a clear view of the drain plug.
Remove The Drain Plug
Once you’ve located the drain plug, grab your wrench. Carefully turn the plug counterclockwise to loosen it. Be ready with an oil pan underneath to catch the oil as it flows out. Remember, the oil might be warm, so protect your hands with gloves. As you remove the plug, you might feel a rush of satisfaction knowing you’re getting the job done.
Allow Oil To Drain Completely
Patience is key here. Let the oil drain out completely into your pan. This ensures that no old oil remains, providing a clean slate for the new oil. It’s tempting to rush, but trust the process. Once the flow slows to a drip, you’re good to move to the next step. While waiting, think about how this simple act prolongs your engine’s life. Have you ever wondered how much your efforts impact your vehicle’s performance? Taking time with these steps ensures your car thanks you with better mileage and performance. Now, as you prepare for the next stage, relish the fact that you’re taking control of your vehicle’s health.

Credit: www.fleetio.com
Replace Oil Filter
Changing your engine oil is a vital task that keeps your car running smoothly, and replacing the oil filter is a crucial step in this process. An oil filter works to remove contaminants from your engine oil, ensuring it stays clean and efficient. Neglecting this step can lead to a clogged filter, which might harm your engine and decrease its performance. Let’s dive into how you can effectively replace your oil filter in a few easy steps.
Locate The Oil Filter
Finding the oil filter is your first task. It’s usually situated near the engine block and can vary based on your car model. Check your vehicle’s manual for the exact location. If you’re a visual person like me, a quick search online with your car model can lead you to helpful guides or videos.
Once you locate it, make sure your car is on a flat surface and the engine is cool. This ensures safety and prevents any hot oil from causing burns. You wouldn’t want to learn this the hard way!
Remove The Old Filter
Removing the old filter is a straightforward process but requires some patience. Use an oil filter wrench to loosen it; this tool will save you a lot of time and effort. Remember, the filter may contain some old oil, so have a catch pan ready to avoid spills.
As you remove the filter, inspect it for any signs of damage or excessive dirt. This can give you insight into your engine’s health. If you notice the filter is unusually dirty, it might be time to check other engine components.
Install The New Filter
Before installing the new filter, apply a little engine oil to the rubber gasket. This helps create a secure seal and makes it easier to remove in the future. Align the new filter and hand-tighten it. Using a wrench could over-tighten and damage the seal.
Once installed, give it a gentle wipe to remove any oil residue. This not only helps in spotting leaks but also keeps your engine compartment looking clean. Have you ever wondered if a simple task like this could save you from costly repairs?
Replacing your oil filter is a task that boosts your car’s performance and extends its life. With each step, you gain confidence and a sense of accomplishment. Ready to keep your engine purring like a kitten?
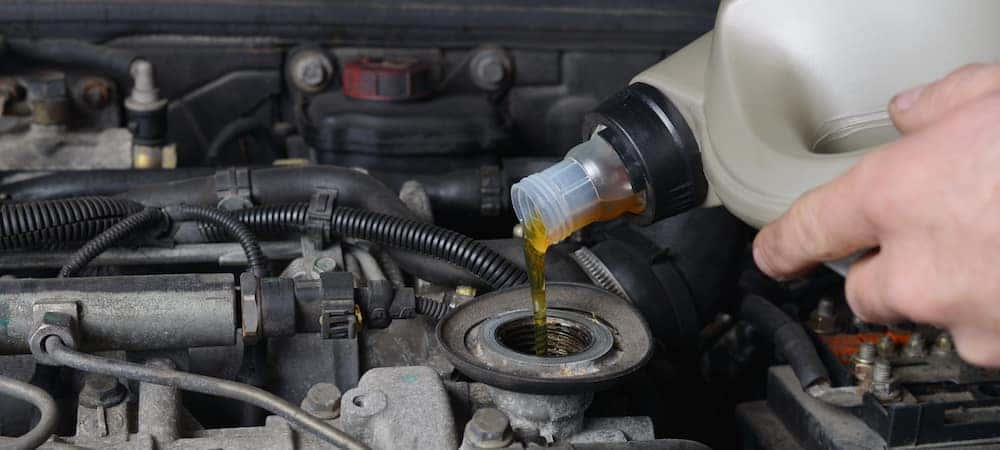
Add New Oil
Follow this guide to add new oil and keep your engine running smoothly. Start by gathering necessary tools like a wrench and oil pan. Then drain old oil, replace the filter, and pour fresh oil.
Adding new oil to your engine is a crucial step. It ensures your vehicle runs smoothly and efficiently. After draining the old oil, it’s time to replenish. Here’s how to add new oil correctly.
Select The Right Oil
Choosing the right oil is essential. Consult your vehicle’s manual. It will specify the type and grade of oil needed. Common types include synthetic, conventional, and blended oils. Each type has its own benefits. Synthetic oils often offer better performance. Conventional oils are usually cheaper. Blends can provide a balance of both. Ensure the oil’s viscosity matches your engine’s needs. This ensures optimal performance.
Pour New Oil
Locate the oil filler cap on your engine. It’s usually marked with an oil can icon. Remove the cap carefully. Use a funnel to avoid spills. Pour the oil slowly into the funnel. Check your manual for the correct amount. Overfilling can harm the engine. Use a steady hand. Pouring too fast can cause overflow. Be patient. Allow the oil to settle.
Check Oil Levels
After pouring, it’s time to check the levels. Start the engine and let it run briefly. Turn it off and wait a few minutes. This lets the oil settle. Pull out the dipstick and wipe it clean. Insert it back fully, then remove it again. Look at the oil mark on the dipstick. It should be between the minimum and maximum lines. If low, add more oil. If correct, replace the dipstick securely. Your engine is now ready to run efficiently.

Credit: gomechanic.in
Dispose Of Old Oil Properly
Proper disposal of old engine oil is crucial. It prevents environmental harm and promotes safety. Used oil can be hazardous if not handled correctly. Therefore, disposing of it responsibly is an essential step in maintaining your vehicle.
Collect Used Oil
First, ensure all old oil drains completely from your engine. Use a clean container that seals tightly. This prevents leaks and spills. A pan or bucket with a lid works well. Make sure the container is free from contaminants. This keeps the oil pure for disposal.
Find Disposal Sites
Locate nearby disposal sites that accept used oil. Many auto shops offer disposal services. Some gas stations have oil recycling bins. Check local government websites for guidance. They often list approved disposal locations. Make sure to follow all instructions at the site. This ensures safe and proper disposal of your used oil.
Verify Oil Change
Congratulations, you’ve successfully changed your engine oil! But hold on, the job isn’t completely done yet. It’s crucial to verify that everything is functioning correctly after an oil change. Overlooking this step could lead to engine troubles, so let’s ensure your car is in optimal condition. By checking a few key areas, you’ll drive away with confidence, knowing your vehicle is running smoothly.
Start The Engine
First things first, start your engine. Listen closely to the sounds it makes. Is it purring like a content cat, or are there unsettling noises? A smooth startup is a sign that the oil change was effective. Keep an eye on the dashboard for any warning lights—these could signal an issue that needs attention. Starting the engine will circulate the new oil and allow you to assess its impact on engine performance.
Check For Leaks
With the engine running, step out of your car and take a look underneath. Do you see any oil drips or puddles forming? Leaks could mean the drain plug or oil filter isn’t tightly secured. Use a flashlight to inspect the area around the oil pan and filter. If you spot a leak, tighten the components or replace any faulty parts. It’s better to handle leaks now than deal with costly repairs later.
Monitor Oil Pressure
As the engine continues to run, pay attention to the oil pressure gauge on your dashboard. Is it reading within the normal range? This gauge indicates if the engine is receiving adequate lubrication. If the pressure is too low, it could mean there’s a blockage or insufficient oil. An abnormal reading demands immediate investigation to prevent engine damage. Regularly checking oil pressure ensures your engine stays healthy.
You’ve now verified your oil change, setting the stage for a smooth drive. These steps might seem simple, but they’re vital to your car’s longevity. How does your car’s performance feel after these checks? Share your experiences and insights in the comments below. Your feedback could be the key to helping others maintain their vehicles better.
Maintenance Tips
Changing engine oil is crucial for maintaining vehicle performance. Gather tools, drain old oil, replace the filter, and add new oil. Follow each step carefully for smooth operation.
Maintaining your vehicle’s engine oil is crucial for smooth driving and longevity. Regular attention to oil changes can prevent costly repairs and extend the life of your engine. In this section, you’ll find practical maintenance tips to keep your engine running efficiently. You’ll learn about the ideal oil change schedule and how to spot signs that your oil might need attention.
Regular Oil Change Schedule
Sticking to a regular oil change schedule is essential. Most experts recommend changing your engine oil every 3,000 to 5,000 miles. However, your car’s manual is the best source for specifics. If you drive in extreme conditions—like excessive heat or cold—you might need to change your oil more frequently. My own experience with winter driving taught me to adjust my oil change routine. Missing an oil change once led to a sluggish start on a frosty morning. Keep a log of when you change your oil. A simple note in your phone can remind you. This habit ensures you never miss a change.
Signs Of Oil Problems
Recognizing signs of oil problems can save you from a breakdown. Look out for unusual engine noises. Knocking or rumbling might indicate low oil levels or poor quality oil. Check the oil color on your dipstick. Healthy oil should be amber and clear. If it’s dark or gritty, it’s time for a change. Pay attention to your dashboard’s oil light. It’s not just a suggestion; it’s a warning. Ignoring it could lead to severe engine damage. Have you noticed a persistent oil smell inside your car? This could mean a leak. Addressing leaks quickly prevents further issues and keeps your car safe. Staying vigilant about these signs will help you maintain your engine’s health. Are you confident in spotting these signs in your vehicle? Engaging with your car’s needs ensures a smoother and safer driving experience.
Frequently Asked Questions
How To Do An Oil Change Step By Step?
Start by gathering necessary tools and oil. Warm the engine slightly. Place a pan under the oil pan. Remove the drain plug and let the oil drain completely. Replace the plug. Remove the old oil filter and install a new one.
Pour new oil into the engine using a funnel.
What Is The First Step To Changing Engine Oil?
Ensure the engine is off and cool. Gather necessary tools and materials like oil, filter, and wrench.
How Easy Is It To Do An Oil Change Yourself?
Performing an oil change yourself is relatively simple. Gather necessary tools and materials, including fresh oil and a new filter. Follow step-by-step instructions provided in your car’s manual. Ensure proper disposal of old oil. With practice, you can complete an oil change in under an hour.
Always prioritize safety and cleanliness.
What Are The 6 Steps To Checking Your Oil?
1. Park the car on a level surface. 2. Turn off the engine and wait for it to cool. 3. Open the hood and locate the dipstick. 4. Pull out the dipstick and wipe it clean. 5. Reinsert and remove the dipstick to check oil level.
6. Add oil if needed.
Conclusion
Changing engine oil is simpler than it seems. Regular oil changes keep your engine healthy. They prevent wear and tear. Start by gathering your tools. Follow the steps carefully. Always use the right type of oil. Dispose of old oil responsibly.
Check your work. This routine can save you money. It also extends your vehicle’s life. Practicing these steps boosts confidence. Your car runs smoother and more efficiently. Routine maintenance is key. Enjoy the satisfaction of a job well done. Keep your engine happy and running strong.
How to Check Tire Pressure Correctly: A Quick Guide