
Are the fog lights on your 2006 Jeep Liberty Renegade KJ giving you trouble? Maybe they’re dim, cracked, or just not functioning as they should.
Whatever the reason, you might find yourself wondering how to remove them without a hitch. Navigating car maintenance can often feel like a daunting task, but what if you could have the confidence of a pro with just a few simple steps?
In this guide, you’ll discover straightforward and practical instructions to safely remove those fog lights. Imagine the satisfaction of tackling this project on your own, saving money and time. You’ll feel empowered by the knowledge you gain, ready to handle more car tasks in the future. Let’s dive in and transform this challenge into a rewarding DIY experience!
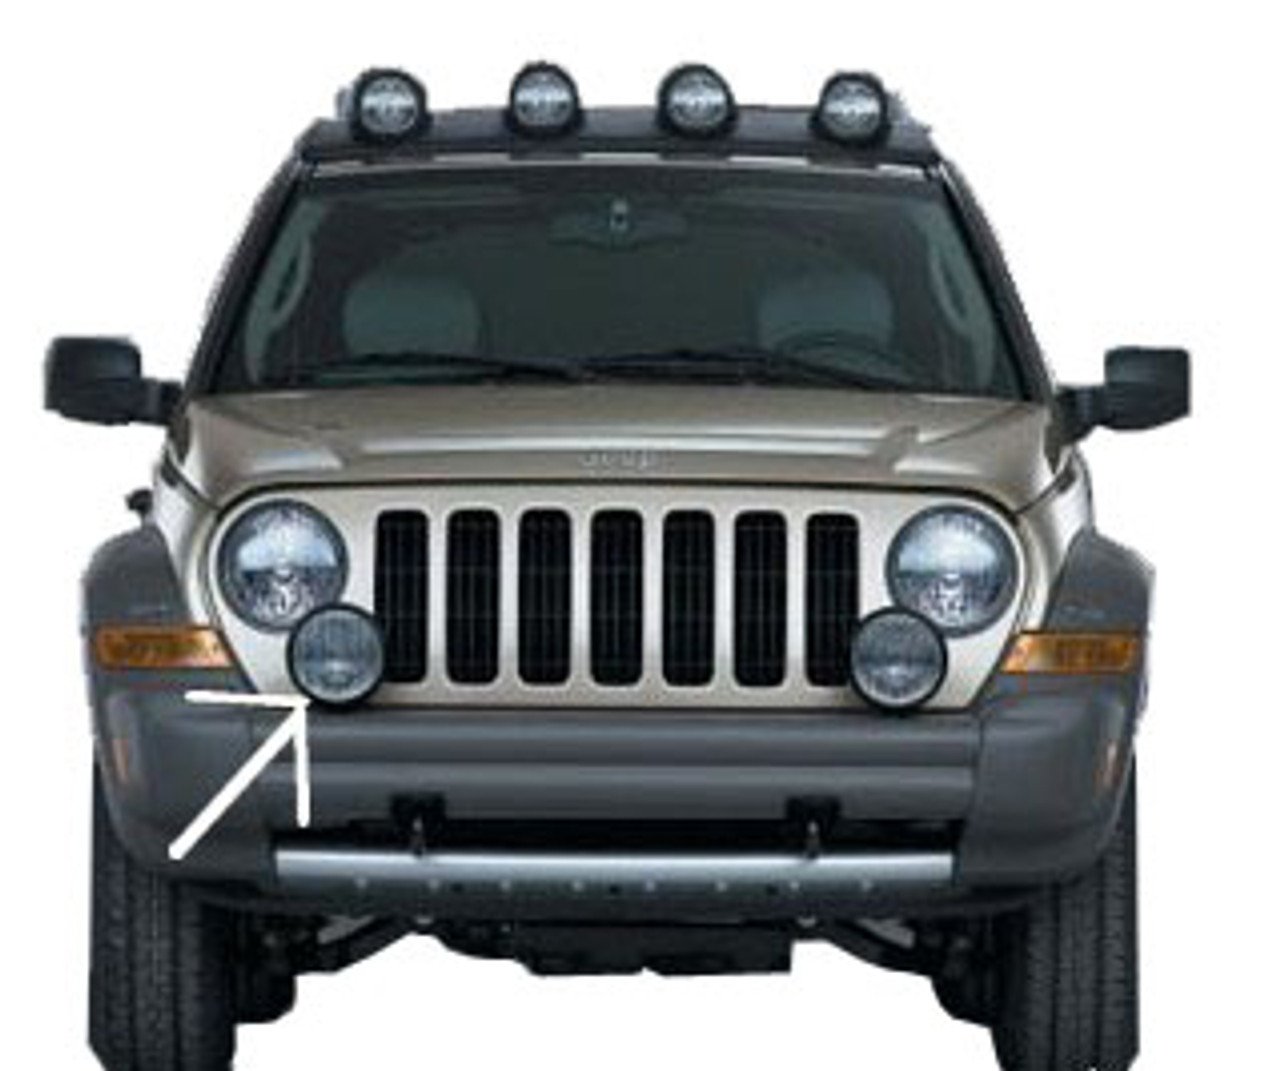
Credit: www.importapart.com
Tools Required
Removing fog lights from a 2006 Jeep Liberty Renegade KJ requires specific tools. Having the right tools ensures a smooth and efficient process. Without them, the task can become frustrating.
Phillips Head Screwdriver
A Phillips head screwdriver is essential for removing screws. It helps in detaching the fog light housing from the vehicle.
Socket Wrench Set
A socket wrench set is necessary to loosen bolts. It provides the torque needed to remove tightly fitted components.
Flat Head Screwdriver
Flat head screwdrivers assist in prying off panels. They help to gently remove clips without causing damage.
Protective Gloves
Protective gloves shield hands from sharp edges. They ensure a safe working environment while handling tools.
Safety Goggles
Safety goggles protect eyes from debris. They’re crucial when working beneath the vehicle or around small parts.
Safety Precautions
Ensure the vehicle is off and parked securely before beginning. Disconnect the battery to prevent electrical hazards. Use gloves and safety goggles to protect hands and eyes during fog light removal.
Removing fog lights from your 2006 Jeep Liberty Renegade KJ may seem straightforward, but safety is paramount. Before you dive into the process, understanding and implementing safety precautions can save you from potential harm and ensure a smooth task completion. Whether you’re a seasoned car enthusiast or a beginner, prioritizing safety will help you avoid injuries and mishaps. Let’s discuss how to protect yourself and your vehicle during this procedure.Wear Protective Gear
Safety begins with what you wear. Equip yourself with safety goggles to shield your eyes from debris. Gloves are essential to protect your hands from sharp edges and hot surfaces. Remember, protective clothing is not just a suggestion; it’s a necessity.Disconnect The Battery
Before touching any electrical components, make sure to disconnect the battery. This step prevents electrical shocks and accidental short circuits. Always remove the negative cable first to minimize risks. This simple act can be the difference between a safe operation and a dangerous one.Use Proper Tools
Ensure you have the right tools for the job. Using inappropriate or makeshift tools can lead to injuries and damage to your vehicle. A set of screwdrivers, pliers, and a socket wrench are typically needed. Double-check your toolbox and avoid improvising with tools not meant for automotive tasks.Work In A Safe Environment
Choose a well-lit, clutter-free space to work on your Jeep. An organized environment reduces the risk of accidents and misplaced parts. Make sure your vehicle is parked securely, with the emergency brake engaged. A safe environment keeps you focused and efficient.Be Mindful Of Hot Components
If you’ve recently driven your Jeep, let it cool down before starting the fog light removal. Parts under the hood can become extremely hot and burn you. Patience here is key—waiting a few minutes can save you from painful burns. Remember, safety isn’t just about avoiding accidents—it’s about ensuring you’re in the best position to get the job done right. Have you ever skipped a safety step and regretted it? Think of these precautions as your insurance policy against the unforeseen. Your Jeep Liberty Renegade deserves the best care, and so do you.Locating The Fog Lights
Locating the fog lights on a 2006 Jeep Liberty Renegade KJ is the first step in removing them. Their position is crucial for easy access. Understanding this will simplify the removal process.
Identifying The Fog Light Placement
The fog lights are typically found at the front of the Jeep. They are below the headlights, integrated into the bumper. This area is engineered to enhance visibility during foggy conditions. Look for round lights near the bumper’s lower section.
Inspecting The Front Bumper
The front bumper houses the fog lights securely. Check the bumper for screws or clips holding the lights in place. Understanding the attachment will aid in safe removal. Examine closely to avoid damage.
Checking The Electrical Connections
Fog lights are connected via wires to the Jeep’s electrical system. Locate these connections behind the fog light assembly. Identifying the wiring will help in disconnecting safely. Ensure no wires are damaged during inspection.
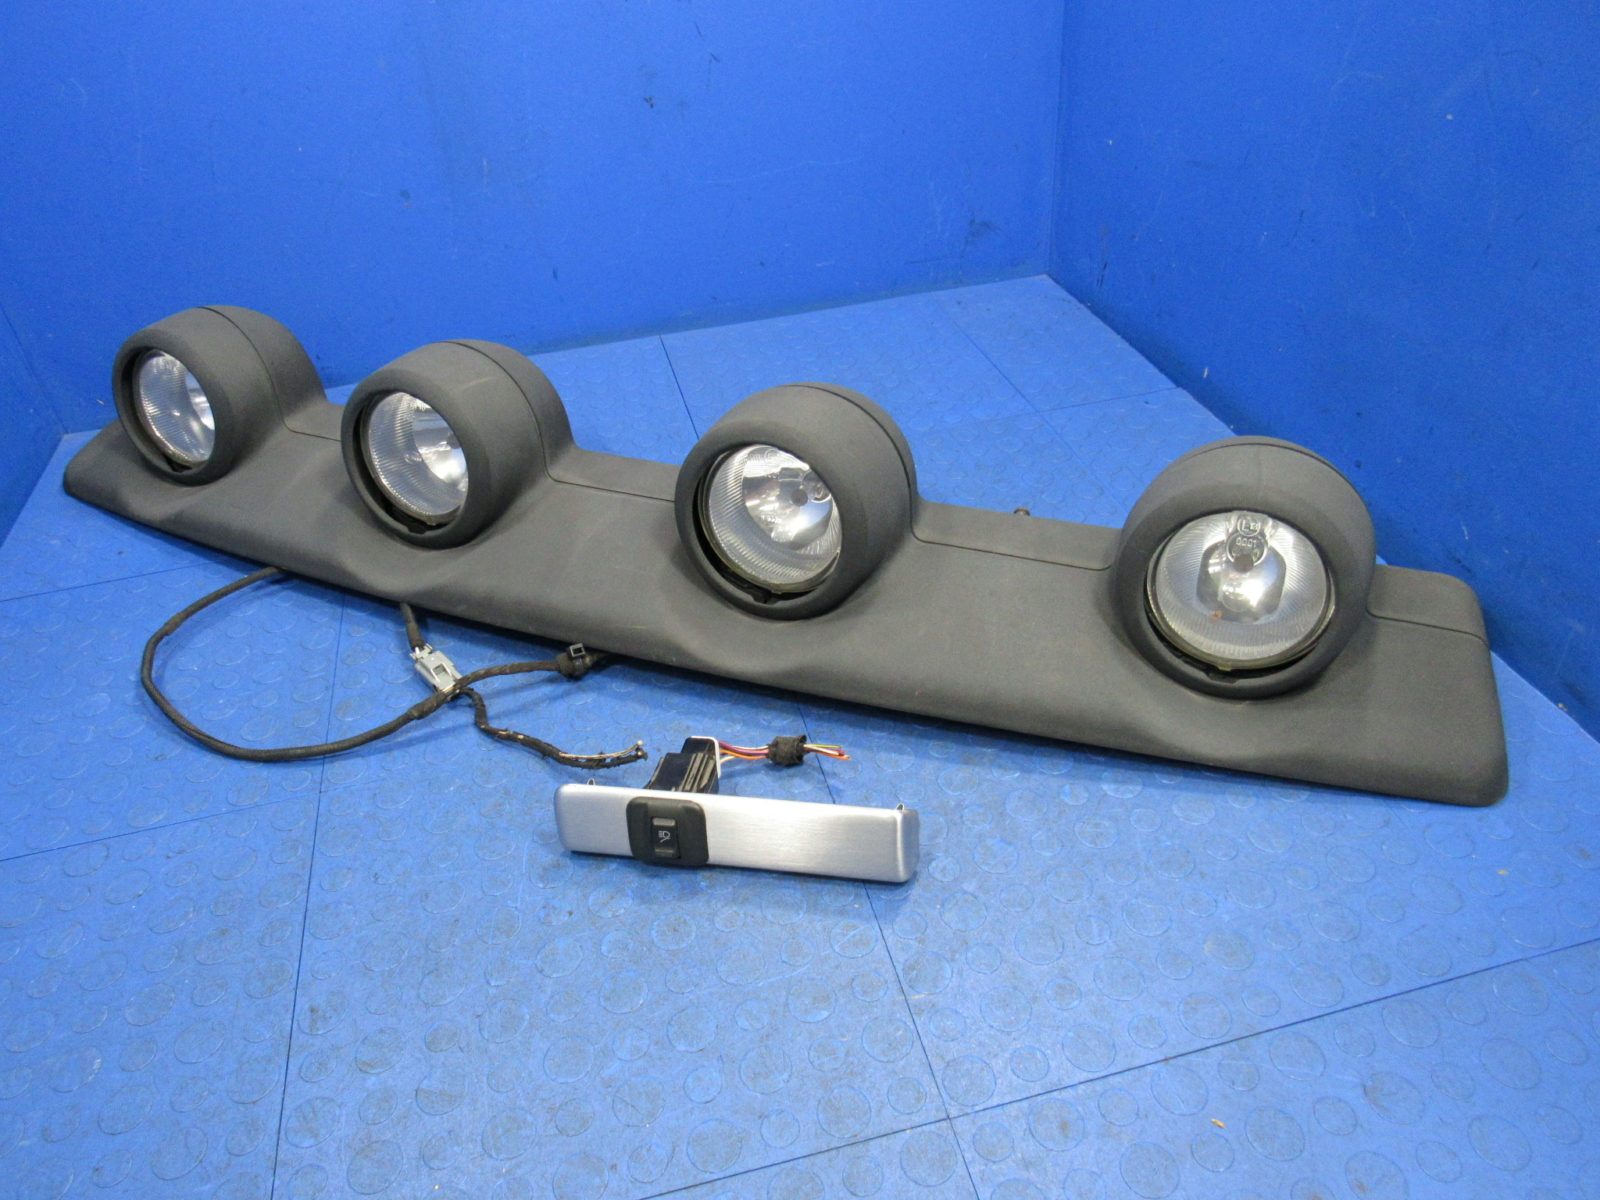
Understanding The Light Housing Design
The fog light housing is designed for easy removal. Look for screws or fasteners securing the housing. This design allows for straightforward maintenance. Recognize how the housing integrates with the bumper.
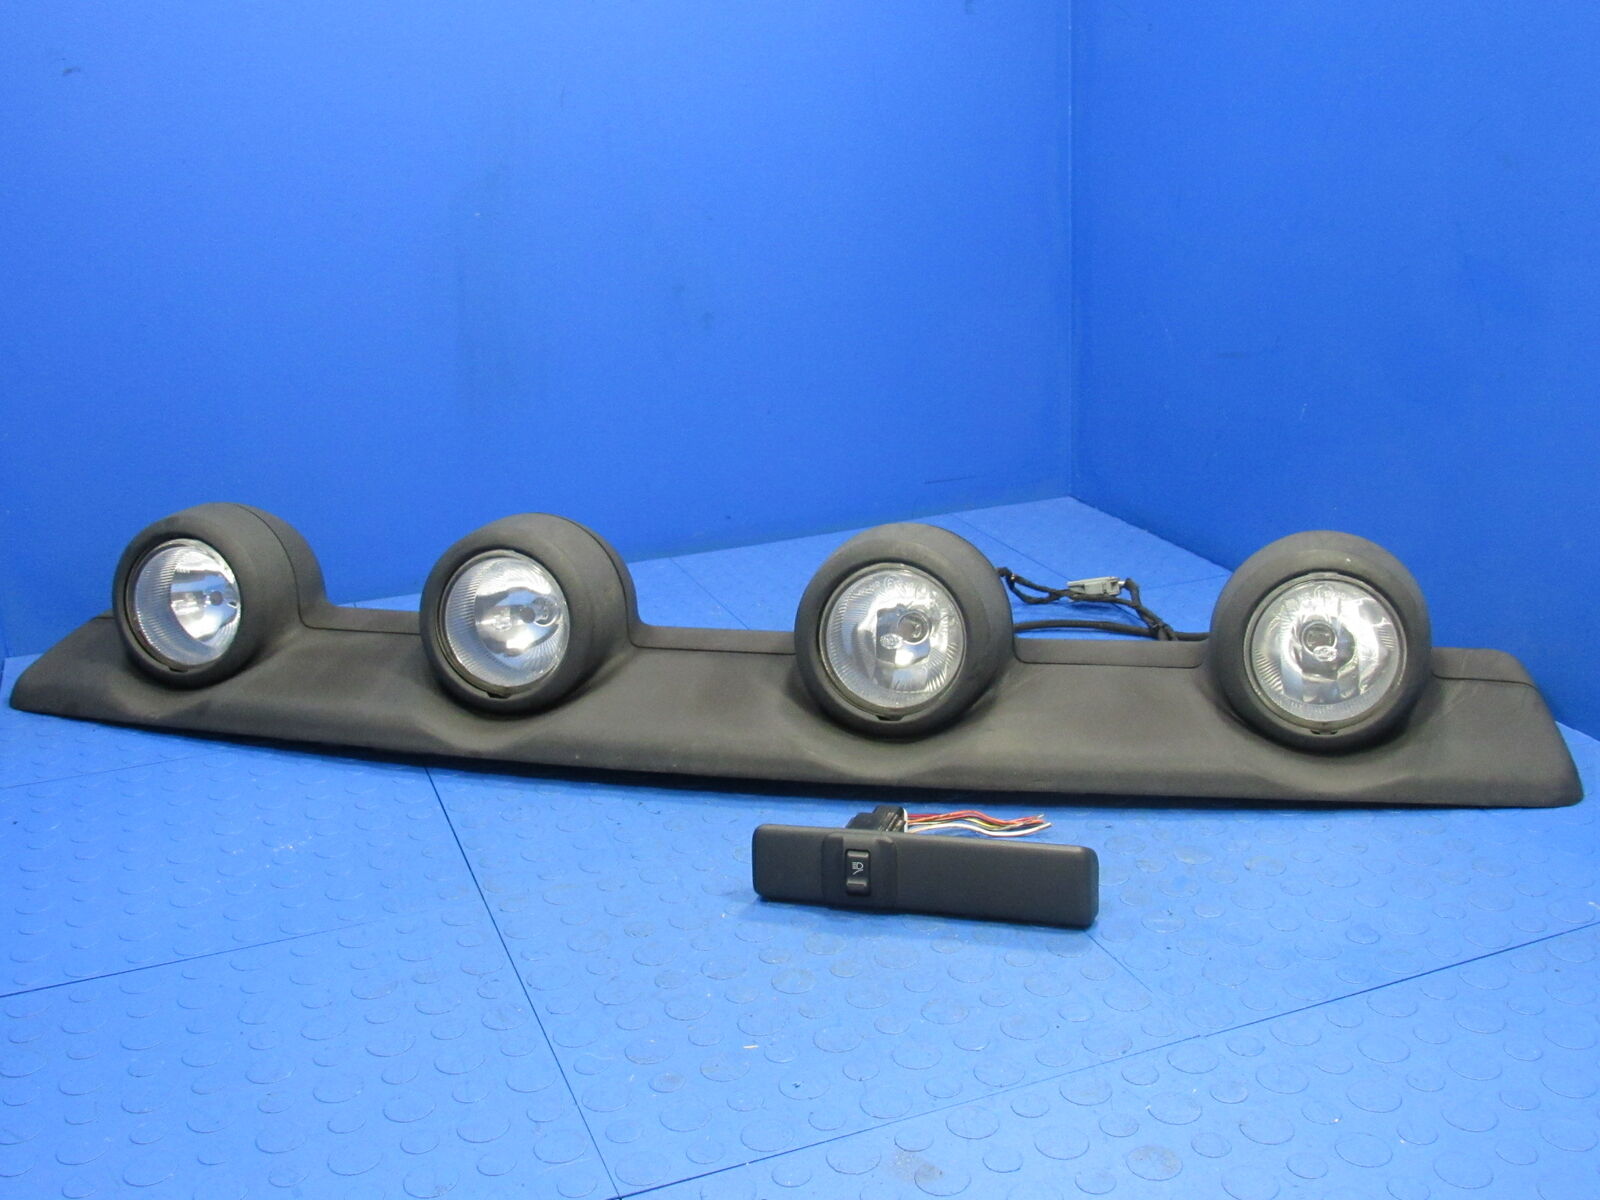
Credit: www.importapart.com
Removing The Fog Light Cover
Removing the fog light cover is an essential step when replacing Jeep Liberty Renegade KJ fog lights. It’s a straightforward process if you follow the right steps. This guide provides a clear, easy-to-follow method to help you through the removal process.
Locate The Fog Light Assembly
Find the fog light assembly on the front bumper. It’s typically positioned below the main headlights. Ensure your Jeep is parked on a level surface. This prevents any accidental movement during the removal process.
Gather Necessary Tools
Collect the required tools for the job. You will need a Phillips screwdriver. A clean cloth is also helpful to avoid scratches. Keep these tools handy for a smooth removal process.
Unscrew The Cover
Identify the screws securing the fog light cover. Use the Phillips screwdriver to loosen these screws. Turn the screws counterclockwise until they come off. Carefully store these screws for future use.
Detach The Cover
Gently pull the cover away from the assembly. Do this with a steady hand to prevent damage. If the cover seems stuck, check for hidden screws. Ensure all screws are removed before applying extra force.
Inspect For Damage
Examine the cover for any signs of wear or damage. This helps in deciding if a replacement is necessary. Clean the cover with a cloth if it appears dirty. A clean cover ensures better visibility and aesthetics.
Disconnecting The Wiring
Disconnecting the wiring of your 2006 Jeep Liberty Renegade KJ fog lights is a crucial step. It ensures safety and prevents damage during removal. This task requires attention to detail. Understanding the wiring system will make the process smoother.
Step 1: Locate The Wiring Harness
The wiring harness is behind the fog light. Use a flashlight to see it clearly. This harness connects the fog light to the vehicle’s electrical system.
Step 2: Inspect For Damages
Check the wires for any visible damage. Look for cracks or wear. Damaged wires can cause electrical issues.
Step 3: Disconnect The Wiring Plug
Find the connector plug on the wiring harness. Gently squeeze the sides of the plug. Pull it away from the fog light to disconnect.
Step 4: Secure The Wiring
Keep the disconnected wiring secure. Use a zip tie or tape. This prevents the wires from dangling or getting caught.
Step 5: Ensure Safe Handling
Avoid pulling the wires forcefully. This can cause damage. Handle with care to maintain the integrity of the wiring system.
Unbolting The Fog Light Assembly
Removing the fog lights from your 2006 Jeep Liberty Renegade KJ requires precision and patience. The process involves unbolting the fog light assembly. It’s simpler than you might think. With the right tools, anyone can do it.
Gather Your Tools
First, collect all necessary tools. You’ll need a screwdriver and wrench. Ensure they are in good condition. A flashlight will help in dark spots. Remember, safety goggles protect your eyes.
Locate The Fog Light Assembly
The fog light assembly is beneath the front bumper. Check the owner’s manual for exact positioning. This ensures you don’t damage any parts. Look for screws securing the assembly.
Begin Unbolting
Use your wrench to loosen the bolts. Turn them counterclockwise. Do this gently to avoid stripping. Keep the screws safe for reassembly. Remember, patience is key.
Remove The Assembly
Once bolts are loose, carefully pull the assembly. It should come out easily. If stuck, check for missed screws. Ensure you disconnect any wiring. Your fog lights are ready for replacement.
Store The Parts Safely
Place removed parts in a safe container. This prevents loss or damage. Label each part for easy identification. Ensure they are clean before storage. Your Jeep is ready for new fog lights.
Removing The Fog Light
Learn to remove the fog lights from a 2006 Jeep Liberty Renegade KJ with ease. Start by disconnecting the battery for safety. Then, unscrew the mounting bolts and carefully detach the fog light housing.
Removing the fog lights from your 2006 Jeep Liberty Renegade KJ might seem daunting, but it’s simpler than you think. Whether you’re replacing a burnt-out bulb or upgrading to a brighter set, this guide will walk you through the process seamlessly. Imagine the satisfaction of completing this task yourself and enhancing your Jeep’s functionality and appearance.Gather Your Tools
Before diving into the removal process, ensure you have the right tools. A screwdriver, socket wrench, and a pair of gloves are essential. These will help you maneuver the parts with ease and protect your hands. It’s always better to be prepared than to pause midway because you lack a tool.Locate The Fog Light Assembly
Start by identifying the fog light assembly underneath the front bumper. You might need to crouch or lie down to get a clear view. The assembly is usually secured by screws or clips. Getting familiar with the setup will make the removal process straightforward and prevent any surprises.Detach The Wiring Harness
Carefully disconnect the wiring harness from the fog light. This step requires attention as the wires can be delicate. Pull gently but firmly to avoid damaging the connectors. A damaged wire can lead to electrical issues, so handle with care.Remove The Screws Or Clips
With your screwdriver or socket wrench, begin unscrewing or unclipping the fog light from its mount. It’s a simple task that requires patience. If you’ve ever replaced a light bulb, you know that a steady hand makes all the difference. Removing these fasteners will set the fog light free.Carefully Extract The Fog Light
Once the fasteners are removed, gently slide the fog light out of its housing. It’s like pulling a book from a tightly packed shelf—steady and deliberate. Don’t rush this step, as forcing the light out might cause damage. Consider how smoothly things can go when you don’t hurry.Inspect And Clean The Area
Before installing a new fog light or reassembling, inspect the area for dirt or debris. A clean surface ensures better performance and longevity. Wipe down the housing with a clean cloth—don’t you love how satisfying it is to see a clean, polished finish?Reflect On The Process
As you finish, think about the skills you’ve honed during this task. Isn’t it empowering to handle car maintenance yourself? What other parts of your Jeep might need attention? Your journey doesn’t end here; it’s just beginning. Embrace the possibilities. Removing the fog light is a task that builds your confidence and skill set. It’s more than a repair; it’s a step towards mastering your Jeep’s maintenance.Inspecting And Cleaning The Area
Inspecting and cleaning the area is crucial before removing fog lights. Dirt and debris can hinder the process. Ensure the area is clear and accessible for smooth removal of the 2006 Jeep Liberty Renegade KJ fog lights.
Inspecting and cleaning the area around your 2006 Jeep Liberty Renegade KJ fog lights is an essential step before removal. It not only ensures that you have clear visibility of all components but also prevents dirt from causing damage during the process. By taking the time to thoroughly clean and inspect, you set yourself up for a smoother and more efficient removal.Inspecting The Fog Light Housing
Start by giving the fog light housing a good look. Check for any visible signs of damage or wear. Look for cracks, fogging, or water inside the housing. These could be indicators of other issues that need addressing. Does your fog light housing look faded or cloudy? This might be a sign that moisture has seeped in, which could affect the light’s performance. Identifying these signs early can save you from unexpected surprises later on.Cleaning The Surrounding Area
Before getting your hands dirty, gather the right cleaning materials. A soft microfiber cloth, mild soap, and water should do the trick. Avoid harsh chemicals as they might damage your Jeep’s exterior. Carefully clean around the fog light to remove any dirt or debris. This not only makes the removal process cleaner but also helps you spot any hidden screws or fasteners. A clean surface is easier to work with, saving you time and effort.Checking For Obstructions
Make sure there are no obstructions around the fog light area. Check for any cables, wires, or components that might get in the way during removal. Identifying these obstructions early can help you navigate the removal process smoothly. Have you ever found an unexpected wire or component blocking your way? It’s frustrating, right? By checking for obstructions now, you can avoid these inconveniences and streamline your work.Ensuring Safe Access
Ensure you have safe access to the fog light area. Position your Jeep on a flat surface and make sure it’s securely parked. Consider using a flashlight to illuminate the area for better visibility. Is your workspace safe and well-lit? A secure environment prevents accidents and ensures that you can focus on the task at hand without distractions. Always prioritize safety when working on your vehicle. Inspecting and cleaning the area might seem like extra work, but it’s a crucial step in the fog light removal process. Have you ever skipped a step and regretted it later? Taking these precautions ensures a smoother and more effective removal, saving you from potential headaches.Installing New Fog Lights
Installing new fog lights on your 2006 Jeep Liberty Renegade KJ can enhance visibility. It provides safety during foggy or low-light conditions. This process is straightforward but requires careful attention to detail. Ensure you have the right tools and replacement fog lights before starting. This guide will help you with each step.
Choosing The Right Fog Lights
Select fog lights compatible with your Jeep Liberty Renegade KJ. Check the size and type in your vehicle manual. Ensure the lights fit properly in the designated area. Consider brightness, durability, and energy efficiency. LED fog lights are popular for their long life and bright illumination.
Preparing The Vehicle
Park your Jeep on a flat surface. Turn off the engine and engage the parking brake. Disconnect the battery to ensure safety. Remove any debris or dirt around the fog light area. This helps in a clean installation.
Removing Old Fog Lights
Locate the fog light housing underneath the bumper. Unscrew the bolts using a wrench. Carefully pull out the old fog lights. Disconnect the wires attached to the old lights. Keep the screws safe for the new installation. Clean the area before placing new lights.
Connect the wires to the new fog lights. Ensure the connections are secure. Place the fog lights into the housing. Align them correctly to fit snugly. Use the screws to tighten the fog lights in place. Ensure they don’t move or shake.
Testing The Fog Lights
Reconnect the vehicle battery. Start the Jeep and test the fog lights. Check if they illuminate properly. Ensure they are aligned for optimal visibility. Make adjustments if needed for better focus and direction.
Testing The Installation
Testing the installation is crucial after removing fog lights from a 2006 Jeep Liberty Renegade KJ. Ensure all connections are secure and the lights function properly. A thorough check prevents issues and guarantees safe driving conditions.
Testing your installation of fog lights is a crucial step in ensuring their proper functionality and longevity. It’s not just about flipping a switch and seeing if they light up. You need to ensure that these lights are working as intended, providing the clarity and visibility you need during those foggy drives. Taking the time to test your installation can save you from potential mishaps later on.Check The Light Alignment
Begin by observing the alignment of your fog lights. Are they pointing in the correct direction? Proper alignment is essential for effective illumination. Misaligned lights can cause glare, reducing visibility instead of enhancing it. Take a few moments to adjust them, aiming for a balance between coverage and focus.Verify Electrical Connections
Ensure that all electrical connections are secure. Loose wires can lead to flickering lights or, worse, complete failure. Check each connection, making sure they are tight and insulated. A simple tug can reveal if any wires are at risk of coming undone.Test In Real Conditions
Once you’ve checked the basics, take your Jeep out for a test drive. Experience how the fog lights perform in actual foggy conditions. Are they cutting through the mist effectively? Consider driving in various settings to see how well they adapt.Evaluate Brightness And Coverage
Assess the brightness and coverage of your fog lights. Are they illuminating the road sufficiently without blinding oncoming traffic? Proper brightness and coverage can prevent accidents and improve safety. Adjust the intensity if necessary to achieve the best results.Seek Feedback
Sometimes, an outside perspective can be invaluable. Ask a friend or family member to observe the lights while you drive. Their feedback can reveal aspects you might have overlooked. Are your fog lights enhancing visibility, or do they need further adjustment? Testing the installation isn’t just a step; it’s an opportunity to ensure safety and reliability. Have you ever skipped testing only to face issues later? Share your experiences and insights below.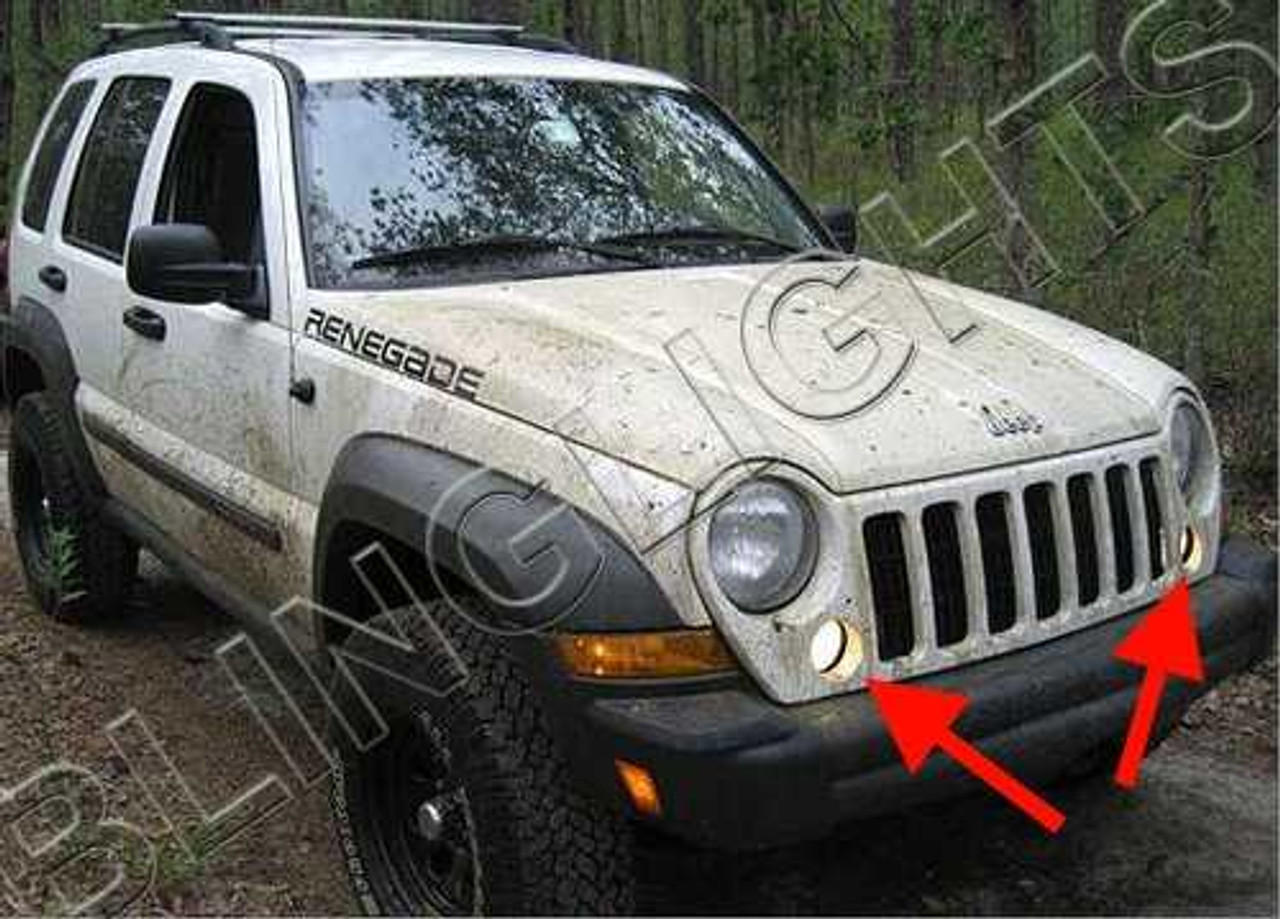
Credit: blinglights.com
Frequently Asked Questions
Can I Remove My Fog Lights?
Yes, you can remove fog lights from your vehicle. Ensure it’s legal in your area before doing so. Removing them may affect visibility in foggy conditions. Consider safety and local regulations before proceeding.
How To Change Out Fog Lights?
Turn off the vehicle and ensure safety. Locate the fog light housing and remove the cover. Unscrew the old bulb carefully. Replace it with a new bulb. Reattach the cover securely. Test the fog lights to confirm proper installation.
Is It Illegal To Drive Around With Fog Lights On?
Driving with fog lights on in clear weather is often illegal. Regulations vary by region. Check local laws. Use fog lights only in fog, rain, or snow. They can blind other drivers when misused. Always ensure proper usage to avoid fines or penalties.
Stay informed and drive safely.
How To Remove Fog Lamp Cover?
First, turn off the car and ensure it’s cool. Use a screwdriver to remove screws around the fog lamp cover. Gently pry off the cover without forcing it. Check your vehicle manual for specific instructions and diagrams. Reinstall the cover by aligning and securing it with screws.
Conclusion
Replacing fog lights on your 2006 Jeep Liberty Renegade KJ is simple. Follow the steps carefully for a smooth process. Prepare your tools and work in a well-lit area. Safety is important, so disconnect the battery first. Remove the screws holding the fog lights securely.
Gently detach the old lights from their sockets. Install the new fog lights, ensuring they fit snugly. Reconnect the battery and test the lights. Everything should work perfectly. This task saves money and gives satisfaction. You maintain your Jeep’s functionality and safety.
Enjoy your well-lit drives ahead!